If you toy with electronics, perhaps with microcontrollers (MCU), you might at some point in time decide to interface your microcontroller to your computer. However, you will come to learn that it would not work for a variety of reasons: one being that you need correct voltage between the computer and the microcontroller, and the second, most critical, you need a way for the computer to recognize and speak to your device.
Well, this is where device drivers are useful. Device drivers are the software need for your computer applications to talk to your device. The power of a device driver and the possibilities that lie with it can not fully be summarized by myself.
So, so whatever reason you many want to write a device driver, in this post, along with others, I will demonstrate how to write a device driver.
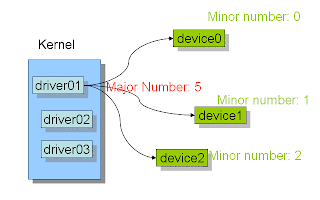
Any given device is only associated with one device driver. However, any given device driver can be associated with many devices.
Consider the image to the right. As device drivers are loading into the kernel, the are given major numbers that uniquely identifies that device driver. Now, as devices as plugged into the machine (computer) the are give minor numbers. The minor numbers serve to help the device driver differentiate one device from the others that it controls.
Continually, the significance of having major and minor numbers is that it allows the kernel to know which driver to invoke when a process (an actively executing program) opens, reads,writes, or closes a device.
Now display the list of files (which are actually devices that are attached to or integrated with your computer) in that directory by issuing the following:
On the 5th and 6th column of the output, are the major and minor numbers for each of these devices.
To display all active modules/drivers use:
To get more information about any individual module that is active use:
To create a new character device with major number 64 and minor number 1, use:
Well, this is where device drivers are useful. Device drivers are the software need for your computer applications to talk to your device. The power of a device driver and the possibilities that lie with it can not fully be summarized by myself.
So, so whatever reason you many want to write a device driver, in this post, along with others, I will demonstrate how to write a device driver.
Major and Minor Numbers
When we write a device driver, that device driver will become part of the kernel and it will have an identification number called a major number. Like a just said, this major number is used to identify a driver. In addition to device drivers, there is almost always a device for which the device driver will "drive". This is to say that the device driver will need a device to operate one. |
| Major vs Minor |
Consider the image to the right. As device drivers are loading into the kernel, the are given major numbers that uniquely identifies that device driver. Now, as devices as plugged into the machine (computer) the are give minor numbers. The minor numbers serve to help the device driver differentiate one device from the others that it controls.
Continually, the significance of having major and minor numbers is that it allows the kernel to know which driver to invoke when a process (an actively executing program) opens, reads,writes, or closes a device.
Practial Example
Open a terminal navigate to the /dev directory.
cd /dev
Now display the list of files (which are actually devices that are attached to or integrated with your computer) in that directory by issuing the following:
ls -l
On the 5th and 6th column of the output, are the major and minor numbers for each of these devices.
To display all active modules/drivers use:
lsmod
To get more information about any individual module that is active use:
modinfo NAME_OF_MODULE
To create a new character device with major number 64 and minor number 1, use:
mknod /dev/yourDeviceName c 64 1
Thanks for your efforts
ReplyDeleteYou are an excellent teacher. Thanks
ReplyDeletewonderful videos on youtube. Really appreciate your effort. God bless! cheerz!
ReplyDelete